
Hardware Installation and Adjustment
Once the door deteriorates to the point that it is unsafe or detracts from the appearance of your home, it's a good time to invest in a new door. Don't overlook the condition of the door jamb - if it's rotting it should be replaced. These are common signs of hardware deterioration that you can detect:
- Every time the door is opened or closed, listen for sounds of wearing metal or door rubbing the frame. Also look at the cantilever arms to make sure they aren't bent.
- Are the main bearings or any of the other pivots worn? They should be oiled monthly.
- Do you have contained springs and safety connectors? Remember if one spring breaks, replace them all. It probably won't be long until the others wear and break.
The bolt should be moved away from the main pivot point or closer to the end of the master arm. Conversely, if the door opens too fast, move the bolt closer to the main pivot point.
- Loosen cantilever arm adjusting bolts.
- Place a wood shim (3/8" thick) under the door about 12" from each side jamb.
- Slide the door into place with the bottom of the door resting on the shims and the top of the door against the header. Position door so it is perfectly vertical and centered, horizontal in the opening. The gap between the door and jamb should be equal (about 3/8" on each side).
- Tighten the nuts on the bolts.
Not until you adjust the garage door hardware (hinges) and springs. The garage door operator only replaces your hand . . . the easier it is for the operator to open and close the door, the longer the operator will last.
First try to think and reason the problem out. If you still have questions, call a qualified garage door professional. E900 professionals can be reached at +1 310-634-0844 and info@onepiecegarage.com.
For two primary reasons, it is not recommended that a replacement hardware set be installed in the existing jamb holes. First, the integrity of the hole is diminished after the first lag screw is removed, and the replacement screw will likely pull out. Second, the measure down dimension of the old hardware may not match the new hardware. Refer to step 4 in the Installation Instructions.
Installation and adjustment must be made in accordance with the installation instructions. The hardware must be mounted while the door is in the closed position. The springs must be mounted and adjusted while the door is in the open position. It is always good practice to advise the customer that the door must be safely propped in the open position while adjusting the springs.
Yes, some adjustments should be made with the door in the closed position.
- If Step 5 of the installation instructions was omitted during the initial installation, the cantilever arm adjustment should be made with door in the closed position.
- If, after cantilever installation, it is determined that there is not enough headroom, the headroom adjustment shown in Step 2 of the installation instructions should be made with the door in the closed position.
We recommend that all pivot points be lubricated at least monthly with a minimum of 30-weight motor oil and a maximum of 90-weight gear oil.
The amount of headroom clearance required will depend on the model number of the hardware. The E900 requires 5" in the #1 headroom hole, 3" in the #2 headroom hole, and 1" in the #3 headroom hole. Refer to Table 1 in Step 2 of the installation instructions. For other model numbers, refer to the book of headroom and swing-out curves.
Hardware Terminology and Parts Clarification
The door jambs are the wood-framing members to which the master plates are mounted. The UBC requires the jambs to be 2 x 6 pieces of lumber that have the density of Douglas Fir or better.
The header is the structural piece of lumber that forms the top of the door opening. It is usually a 4 x 12 piece of lumber or larger, and it supports the weight of the building over the door opening. The garage door should close tightly against the back of the header.
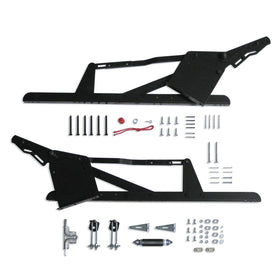
The main pivot point is located where the master arms pivots on the master plate. The master arm is a heavy steel bar, usually 3/8" thick and 1-3/4" wide, to which the kicker and springs are attached. The master arm has between five and seven holes at the end where the springs mount. The master plate is an 8" wide steel plate with a bent flange that mounts to the jamb.
Some of the components are riveted in place in the factory, making it impossible for replacement in the field. Only components that are installed with bolts and nuts are available for replacement.
The measure down dimension is the measurement that is used to correctly position the master plate on the jamb. It is the measurement from the bottom of the header to the lag screw hole for the top hole in the master plate. The measure down dimension is important because it positions the hardware so that, when the door is open, it is sitting level. Each model of hardware has a different measure down dimension, and it is always necessary to add the thickness of the door to the measurement.
At the factory, a 3/8" bolt, bushing, and nut are installed in the kicker slot. The kicker is designed to provide the installer with a method of adjusting the balance of the door in the lower 1/2 of travel. The idea is to provide an additional cushioning effect to keep the door from slamming closed. Refer to Step 11 of the installation instructions. If the bolt, bushing, and nut are missing from the kickers, the customer should contact the factory for replacement.
Door-Specific Questions
We supply a complete line of slide bolts that will help protect valuables in your garage or mini-warehouse. You can add to your security with a Heavy-Duty Security Slide Bolt (SSL-1P) that prevents the shackle of a padlock from being cut, while at the same time allows a second padlock to be added.
This is caused by a measure down dimension that is too large. The hardware is mounted too low on the jamb, and the door opens too far.
Wide doors, like most 2-car garage doors, are usually reinforced with truss rods. If the door does not have truss rods, the customer can be referred to purchase them. If the door has truss rods, they may have loosened allowing the door to sag. In this case, the nuts on the end of the rods should be tightened until the sag is eliminated. In some cases, the door has been sitting in a sagging position for many years, and the wood has permanently deformed. In cases like this, it is impossible to remove all of the sag.
There are a few possible causes:
- The door may be too thick for the size of the door jambs.
- The door jambs may be too narrow for the thickness of the door.
- The installer may have omitted Step 5 of the installation instructions that states "Loosen 3/8" carriage bolts on cantilever arms." This allows the installer to adjust the position of the door angle to accommodate a range of door thickness.
This has several possible causes:
- The measure-down dimension may be too short. This will cause the door to be mounted too high, which prevents the door from opening all the way.
- The springs may not have the recommended 1" to 2" of pre-stretch to hold the door fully open.
- The electric garage door opener may be adjusted to stop before the door is completely open. The customer should refer to the operator instructions or contact the opener manufacturer for the proper steps to adjust the opener.
A common cause for this is that the same measure down dimension was not used on both sides of the door. Another possible cause is that the opening may not be level, making it seem that the door is not level.
First, it is important to determine whether or not the door and the opening are square. Ideally, the door and opening will both be square and fit properly. However, if either the door or the opening is not square, then the door will never sit square in the opening. If both the door and the opening are not square, they must be equally out of square in order for the door to fit properly in the opening. If the door is the correct size and shape to fit properly in the opening, the gap on each side of the door will be 3/8" to 1/2" and uniform. If the gap is not uniform, it is possible that the installer did not use the same size shims on both sides of the door. If the door needs to be re-shimmed, the installer must go back to Step 5 in the installation Instructions and reposition the door angle on the door.
We recommend that the door should be 3/4" to 1" narrower than the opening width and 1" taller than the opening height. It is also important that the squareness of the door match that of the opening.
The thickness of the door should be measured from the back of the door, where the door angle is mounted, to the outermost surface of the face of the door. This must include any decorative molding on the face of the door.
Replacing Springs
We recommend that the springs should be replaced every five years. The warning label on the hardware master plate states: "In the interest of safety, springs that last five years should be replaced."
If one spring has broken, it is likely that the others will also break soon. For this reason, we recommend that all springs should be replaced.
The numbers on the spring label (i.e. "P728") identify the spring with a part number. The letters P, SL or C before the numbers signify the type of spring end, either Plug, Safety Lock or Clip. The first number indicates the wire size and the next two numbers the length of spring. The letter “C” at the end of the number tells you the spring is equipped with safety connectors. For example, a P728C spring has plug ends, is made from #7 wire, is 28” long and has safety connectors. Remember when measuring a spring, measure from end of coil to end of coil, do not include the ends. Measure the springs only when they have been removed from the hardware set. The following identification marks are stamped on the top of the spring: UPC, part number (such as P728), maximum stretch, and safety warnings.
If your door is working properly, just replace your broken spring with the same type of spring. If there is no number on the plug or clip end of the spring, then determining the correct spring to purchase is obtained by calculating the spring’s outside diameter and the spring’s wire size. The wire size can be determined simply by measuring ten spring coils and then dividing this measurement by ten. Remember the best way to locate the proper spring is to find a comparable one on the spring rack.
If the springs are breaking too frequently, you can buy springs made of heavier wire. For example, if you are currently using four P728 springs, you could upgrade your purchase to four P528 springs.
One-piece springs are designed in compliance with the Uniform Building Code (UBC), which states that the springs must be designed to last a minimum of 9,000 cycles.
To comply with the UBC the springs must be designed to last a minimum of 9,000 cycles. The life expectancy will vary depending on how often the door is operated.
Stretching Springs
The Lower Jamb Connector (LJ-1P) lets you stretch the springs with a wrench. The Jamb Connector along with the Adjusta-Matic Kicker (AK-1P), allows you to adjust the leverage and tension of the hardware set without having to remove the springs.
The best alternative for the average homeowner is to recommend that they purchase the Lower Jamb Connector (LJ-1 P) and replace the chain. The LJ- 1P makes it much easier to adjust the stretch of the spring, because it allows the customer to use a screwdriver and/or wrench to make the adjustments. If the customer prefers to use the chain, the spring must be removed from the kicker in order to move the lower end of the spring up or down on the chain. The technique for removing or replacing the spring from the kicker requires good hand, leg, and back strength. To remove the spring from the kicker, the person must (1) straddle the springs with legs bent, (2) firmly grip the top of the springs, and (3) straighten the legs and pull up on the spring removing it from the kicker. The same technique is used to replace the spring.
The best alternative for the average homeowner is to recommend that they purchase the Lower Jamb Connector (LJ-1 P) and replace the chain. The LJ- 1P makes it much easier to adjust the stretch of the spring, because it allows the customer to use a screwdriver and/or wrench to make the adjustments. If the customer prefers to use the chain, the spring must be removed from the kicker in order to move the lower end of the spring up or down on the chain. The technique for removing or replacing the spring from the kicker requires good hand, leg, and back strength. To remove the spring from the kicker, the person must (1) straddle the springs with legs bent, (2) firmly grip the top of the springs, and (3) straighten the legs and pull up on the spring removing it from the kicker. The same technique is used to replace the spring.
The safety containment wire inside the spring may be tangled that prevents the spring from stretching. To untangle, twist the spring 1/2 of a turn when the spring is off the hardware . . . or you might consider purchasing a set of adjustable jamb connectors (LJ-1P) that allows you to pre-stretch the springs easily with a wrench.
The best alternative for the average homeowner is to recommend that they purchase the Lower Jamb Connector (LJ-1P) and replace the chain. The LJ-1P makes it much easier to adjust the stretch of the spring, because it allows the customer to use a screwdriver and/or wrench to make the adjustments. If the customer prefers to use the chain, the spring must be removed from the kicker in order to move the lower end of the spring up or down on the chain. The technique for removing or replacing the spring from the kicker requires good hand, leg, and back strength. To remove the spring from the kicker, the person must (1) straddle the springs with legs bent, (2) firmly grip the top of the springs, and (3) straighten the legs and pull up on the spring removing it from the kicker. The same technique is used to replace the spring.